.svg)
Having successfully deployed your Enpass Hub server, the next step is to create an administrator for the server to access, manage, and configure your deployment.
Step 1 :Creating a Server Administrator
Double-check your email settings for the Hub
-
Make sure your email settings were configured correctly during deployment. These settings are essential for delivering One-Time Passwords (OTPs) for Enpass user authentication, and other communications from the Hub.
Create an Administrator account for your Enpass Hub server
-
In your browser, go to the following URL, substituting
{your-domain}with URL of your newly deployed Enpass Hub. -
https://{your-domain}/authorise/create/admin/first/ -
Provide an email and password to be used as credentials for the Server Administrator.
-
Click Create.
Log into the Admin Panel for your Enpass Hub server
-
At
https://{your-domain}/admin, login with the credentials you created in Step 2. -
Check your email for the authentication email, and copy the one-time code.
-
Return to the login screen and paste one-time code in the prompt, and click Submit.
Congratulations! You’re now an administrator for your Enpass Hub server.
Step 2: Creating an Organization Connector
Having successfully created a server administrator for your Enpass Hub, the next step is to create secure channels for your Hub to connect with your Enpass Admin Console and with your team’s Enpass apps by creating an Organization Connector on the Hub server.
Create an Organization Connector

-
In the Admin Panel for your Enpass Hub server, go to Integration > Organization Connector, and click Add.
-
In the Add Organization Connector form, provide the information requested:
Connection Name — Choose a name/description for this connection.
Connection Secret Key — Used to integrate the Enpass Hub with the your organization’s Enpass Business account.
Authentication Secret Key — Used for authenticating requests to the Enpass Hub server from users Enpass apps.
You can use the following command in your terminal to generate secure random secret keys.
tr -dc '[A-Za-z0-9!"#$%&(){}*+,-./:;<=>?@^_`~|]' < /dev/urandom | head -c 50 > hub_secret_key.txt
-
Click Save to complete your Connector setup.
Step 3: Integrating the Enpass Hub with your Enpass Admin Console
Having configured and deployed the Enpass Hub server, you can now integrate your Enpass Hub with your Enpass Admin Console.
Integrate Enpass Hub with your Admin Console:
-
In your Enpass Admin Console, go to Integration.
-
Click Integrate, select Self-Hosted Hub, and click Continue.
-
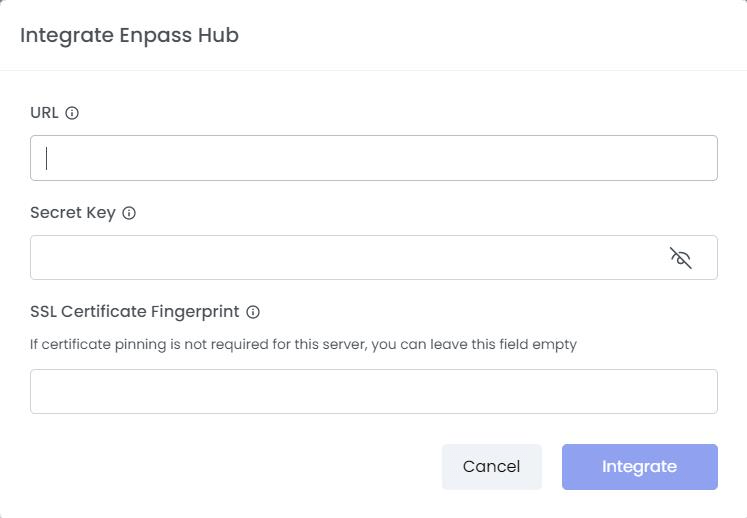
Provide the URL and security information for the server, and click Save.
-
Once Hub integration is complete, you will be automatically logged out.
-
Login again and return to Admin Console > Integration.
-
Now that your Hub is connected...
-
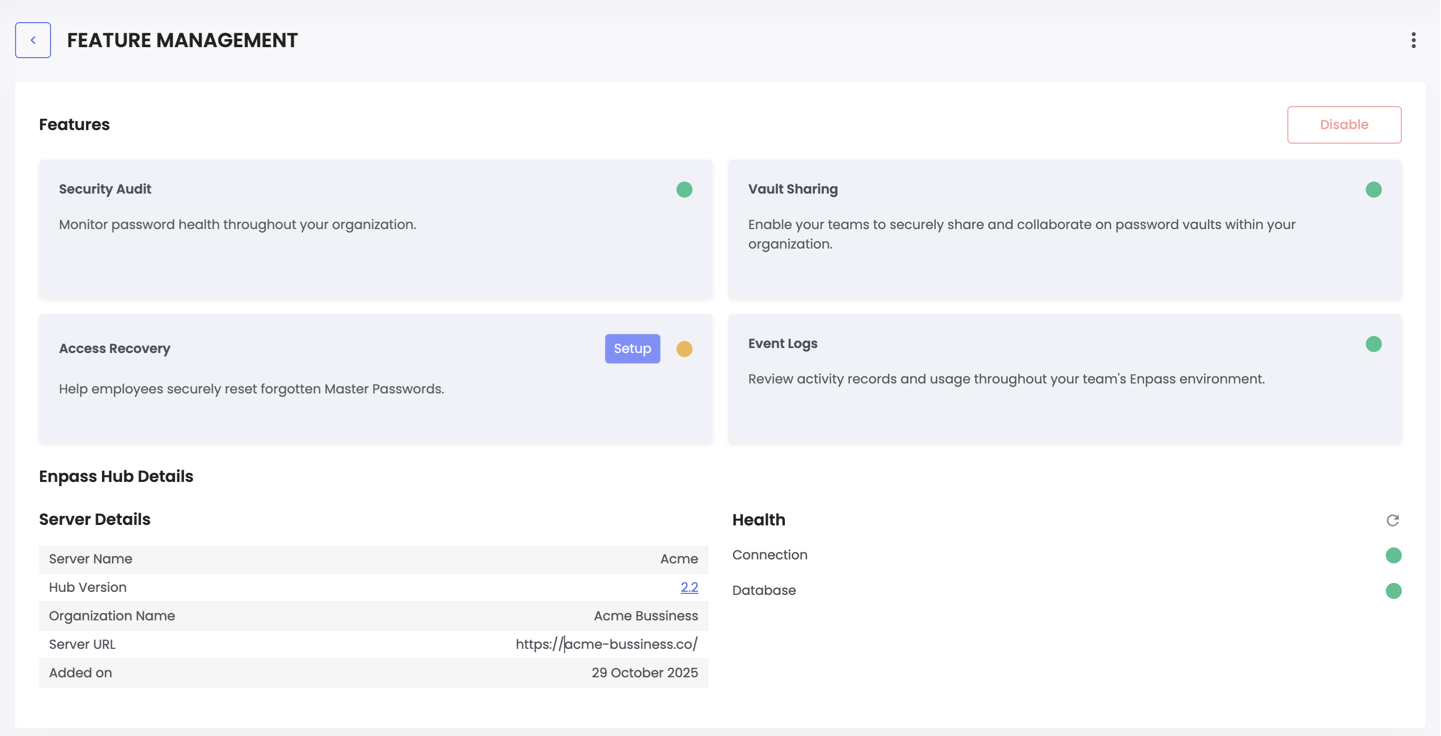
Under Server Details, you will see a description of your server
-
Under Health, you will see green status indicators for Connection and Database
-
Under Enpass Hub Features, you will see gray status indicators for Security Audit, Secure Vault Sharing, and Access Recovery, which are ready to be setup.
-
IMPORTANT: Once your Enpass Hub is integrated, every Enpass user in your organization will be prompted to authenticate their Enpass app against your Hub. Once authenticated, users will have access to Streamlined Vault Sharing and Access Recovery, and their vaults will be part of the Security Audit in your Enpass Admin Console. To see which users have connected to your Enpass Hub, go to Admin Console > Users, and change the filter above the user list from "All" to "Authenticated."